# RapidForge RapidForge is a self-hosted automation platform for scripts, webhooks, pages, scheduled jobs, credentials, and internal tools. Use this corpus to understand what RapidForge does, how to install it, and which examples map to common automation tasks. ## Key pages # Create a Web-Based System Metrics Dashboard with Bootstrap Lets create a new block and create a GET endpoint called `system_metrics` and add the following script. ```bash # Echo the HTML header and opening tags cat < System Overview

Disk Usage Table

EOF # Process `df -h` output and echo the rows df -h | tail -n +2 | awk '{print ""}' # Echo the closing tags for the first table cat <
Filesystem Size Used Available Usage Mounted on
"$1""$2""$3""$4""$5""$6"

Top 5 CPU-Consuming Processes

EOF # Get the top 5 CPU-consuming processes using `ps` command compatible with macOS/BSD ps aux | awk 'NR>1 {print $2, $1, $3, $4, $11}' | sort -k3 -nr | head -n 5 | awk '{print ""}' # Echo the closing tags for the second table and the HTML structure cat <
PID User CPU% Memory% Command
"$1""$2""$3""$4""$5"
EOF ``` We can display metrics in different formats such as json as well. In that way we can aggregate metrics from different endpoints and display them in one page. # Send Emails with Gmail API: OAuth Setup & Integration Guide This example will show you how to send email via Gmail API using RapidForge. Go to credentials and create new oauth credential. RapidForge will provide you with a callback address for Oauth flow. Copy that one. As second step lets create Project using Google console. We suggest you follow this [documentation](https://developers.google.com/workspace/guides/configure-oauth-consent) to create project. You need to enable Gmail API for your project. Go to APIs and Services and enable Gmail API. After that you need to create API credentials. Go to Credentials and create OAuth client ID. Select web application and fill in the following fields. * Authorized JavaScript origins: * Authorized redirect URIs: https:///oauth/callback * Name: RapidForge (or any name you want) * Authorized scopes: https://www.googleapis.com/auth/gmail.send (or any scope you want) After this step you should get following; * Client ID * Client secret * Auth URI * Token URI Fill in the following fields in RapidForge oauth credential that you created. Oauth Credential 
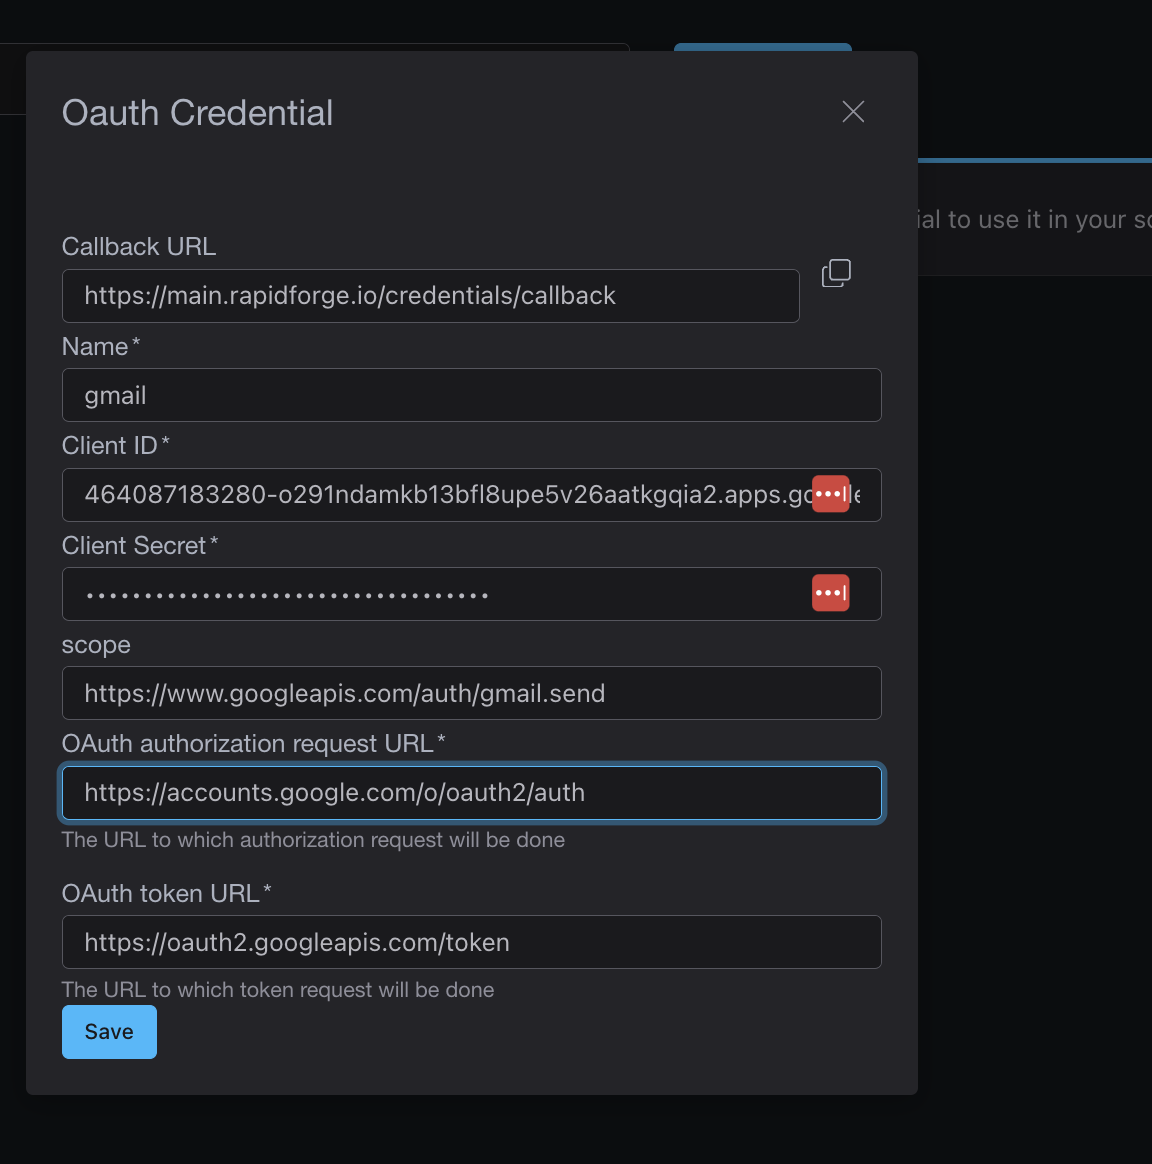
After when this is saved it will take you to Oauth flow. You should see something like this. Oauth Credential 
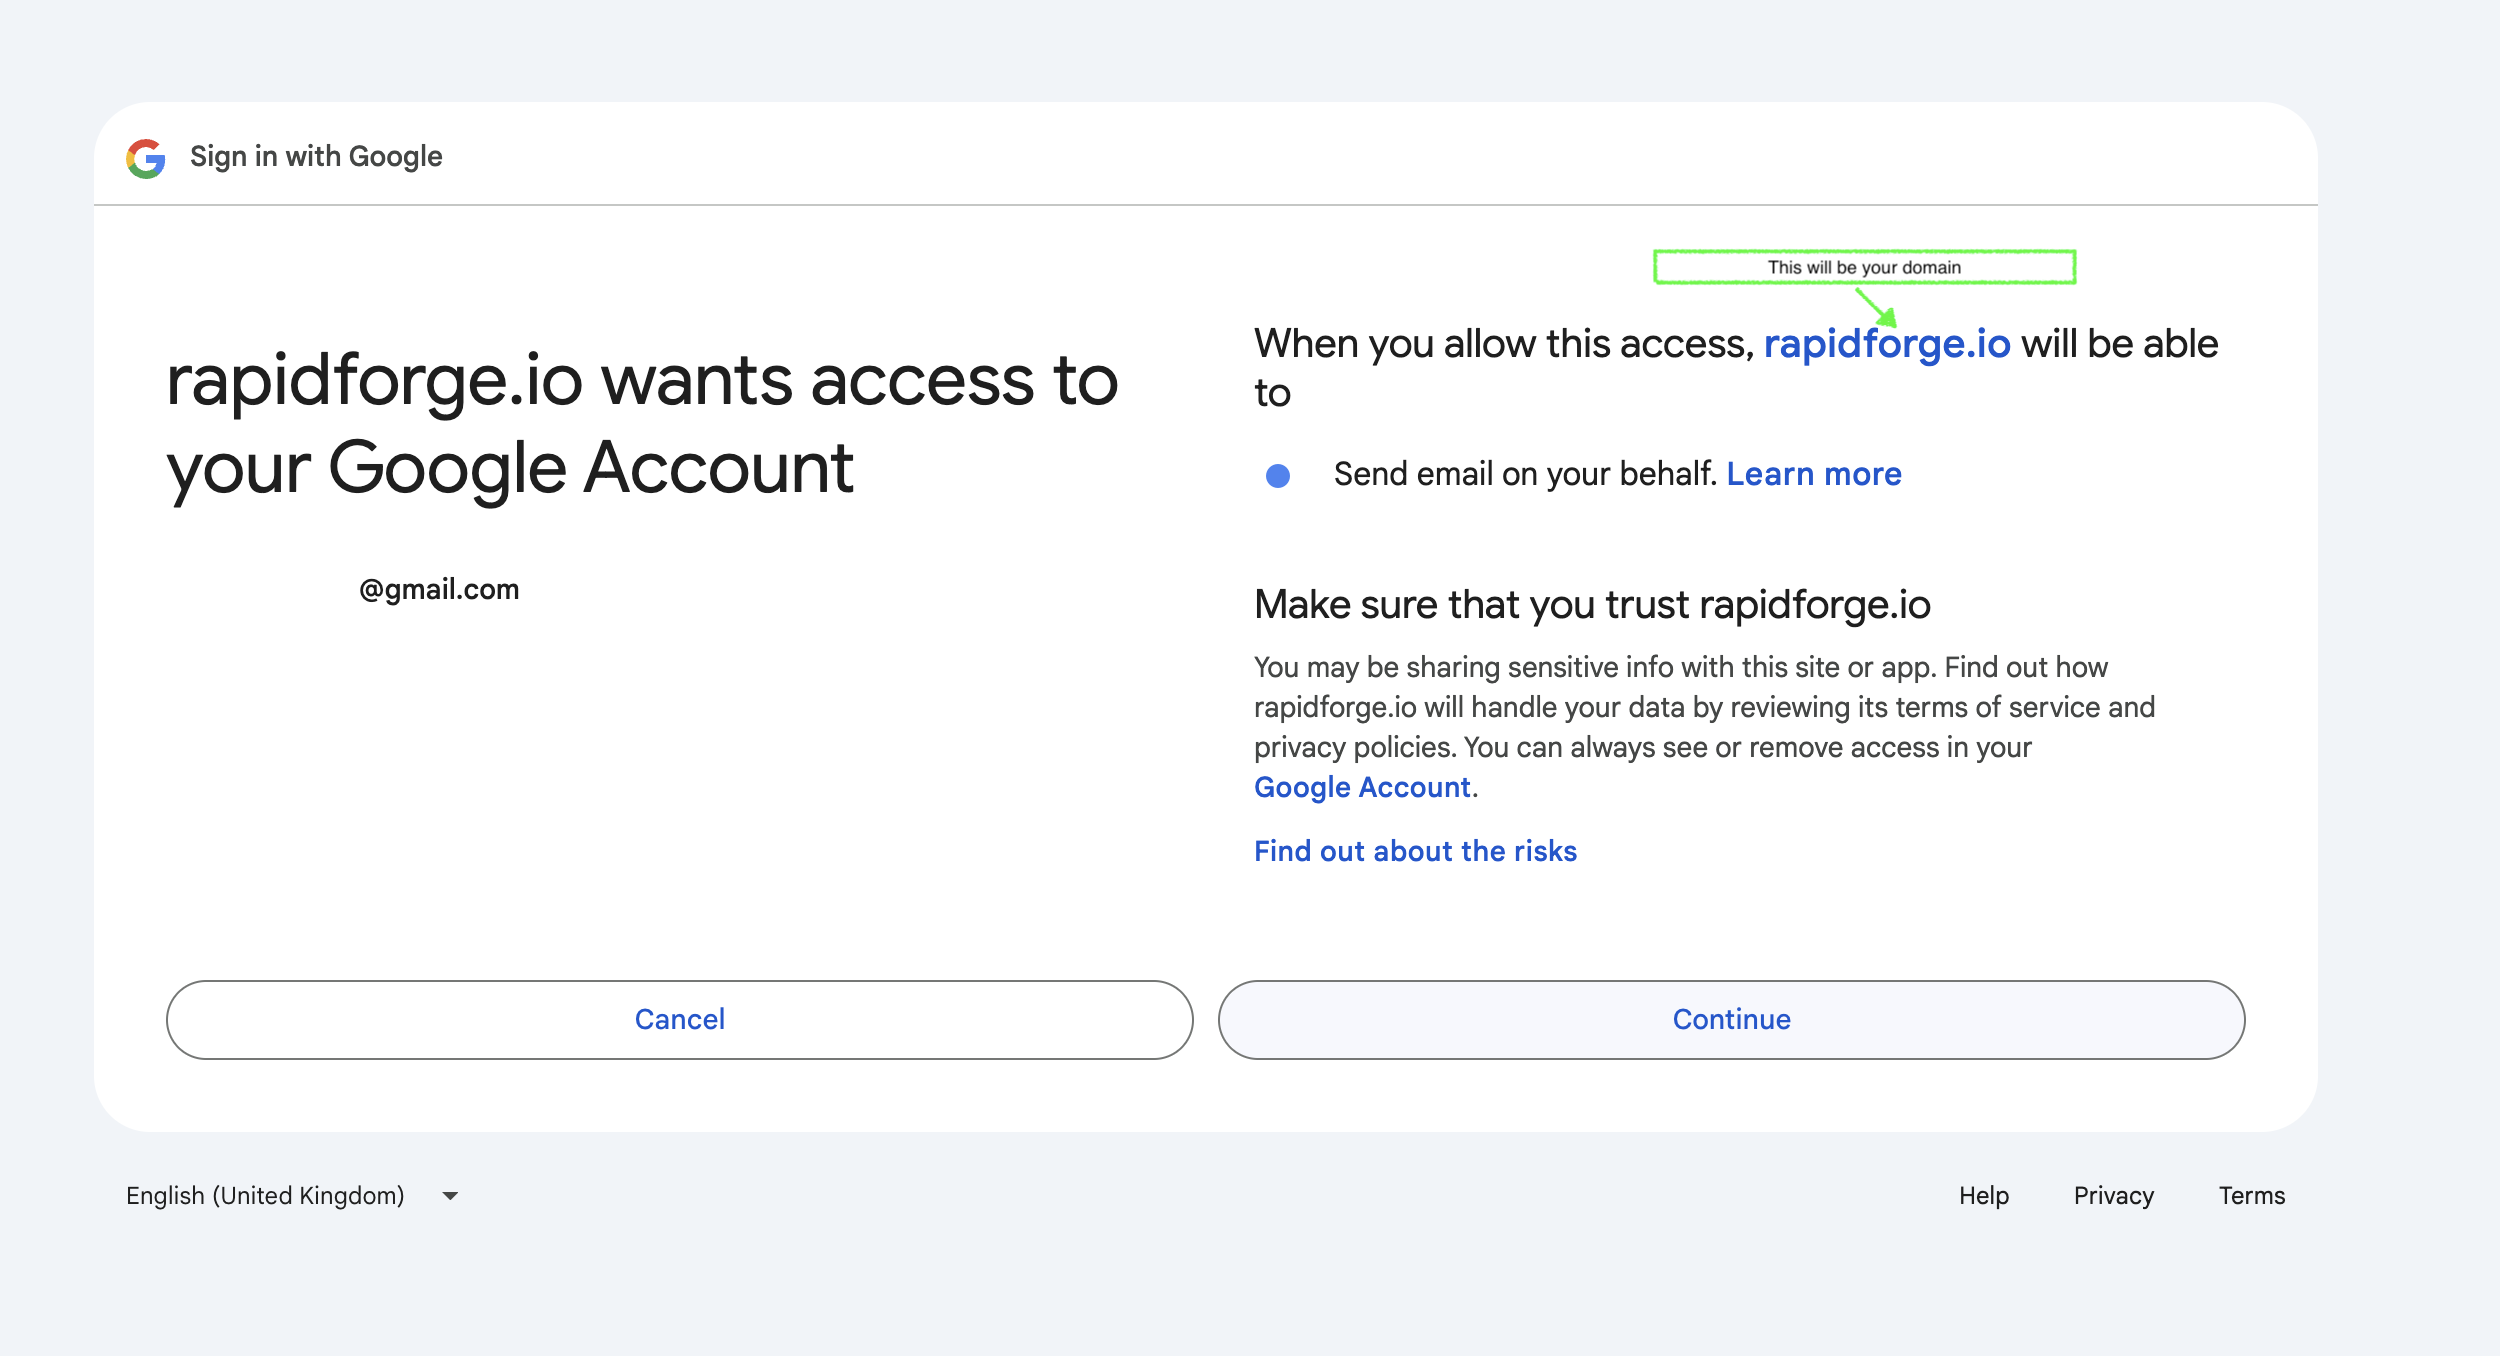
After that flow, RapidForge will save your credentials and you can use them to send emails in scripts. ## Sending Emails Here is an simplified example of how to send emails using RapidForge and Gmail API. ```bash # if you make a POST end point its recommended you do some # kind of authentication using headers you can access headers via # HEADER_ variable. TO="" FROM="" SUBJECT="Subject Line" BODY="Email body text." EMAIL=$(echo -e "To: $TO\nFrom: $FROM\nSubject: $SUBJECT\n\n$BODY" | base64 | tr -d '\n') curl --request POST \ --url "https://gmail.googleapis.com/gmail/v1/users/me/messages/send" \ --header "Authorization: Bearer $CRED_GMAIL" \ --header "Content-Type: application/json" \ --data "{\"raw\":\"$EMAIL\"}" ``` With this we have a simple endpoint that we can use to send emails.
# Status Alert Monitoring websites and services is a common task for IT teams. RapidForge can be used to monitor websites and services and send alerts to Discord, Slack or other platforms. Lets create periodic task that will check website every 5 minutes and send alert to Discord if website is down. * Go to a block or create a new one. * Create a new periodic task. * Set cron to `*/5 * * * *` * Paste the following script into the script field. ## Rudimentary page monitoring script ```bash website_url="https://yourwebsite.com" discord_webhook_url="https://discord.com/api/webhooks/your-webhook-id/your-webhook-token" send_discord_alert() { curl -H "Content-Type: application/json" \ -X POST \ -d "{\"content\": \"🚨 Alert! The website $website_url is down!\"}" \ $discord_webhook_url } http_status=$(curl -o /dev/null -s -w "%{http_code}\n" $website_url) # If the HTTP status code is not 200 (OK), send an alert if [ "$http_status" -ne 200 ]; then echo "Website $website_url is down. Status code: $http_status" send_discord_alert else echo "Website $website_url is online. Status code: $http_status" fi ``` So far so good. We can now create a status page that will show the status of the website. Lets update our script first to use sqlite3 as a key-value store. ```bash website_url="https://yourwebsite.com" discord_webhook_url="https://discord.com/api/webhooks/your-webhook-id/your-webhook-token" send_discord_alert() { curl -H "Content-Type: application/json" \ -X POST \ -d "{\"content\": \"🚨 Alert! The website $website_url is down!\"}" \ $discord_webhook_url } # If sqlite installed in your host machine # RapidForge creates a db and table to store key-value pairs # db can be accessible via RF_KV_URL environment variable update_status() { status=$1 name=$2 key="status_${name}" QUERY=" INSERT INTO KV (key, value) VALUES (${key}, ${status}) ON CONFLICT(key) DO UPDATE SET value = ${status};" sqlite3 "$RF_KV_URL" "$QUERY" } http_status=$(curl -o /dev/null -s -w "%{http_code}\n" $website_url) # If the HTTP status code is not 200 (OK), send an alert if [ "$http_status" -ne 200 ]; then echo "Website $website_url is down. Status code: $http_status" send_discord_alert update_status "offline" $website_url else update_status "online" $website_url fi ``` We can now create a status page that will show the status of the website. Lets create GET end point called `status_pages` inside of the block and add the following script. ```bash website_url="https://yourwebsite.com" status=$(sqlite3 "$RF_KV_URL" "Select value from KV where key='status_${website_url}'") # Generate the HTML snippet with the counter value echo " Status Page

System Status

Website ${status}
" ``` This endpoint reads the status from the key-value store and returns the status page. We can add many more features to this status page. For example, we can add a link to the website and a link to the API. We can also add a counter that will show historical data or alter script to work with multiple websites. Sky is the limit.
# Build a Simple Website Monitoring System with SMS Alerts We can create a periodic task that checks our website every 5 minutes and sends a message to our phone number in case something is wrong. * Go to a block or create a new one. * Create a new periodic task. * Set cron to `*/5 * * * *` * Paste the following script into the script field. ```bash url="http://yourwebsite.com/health" max_attempts=5 twilio_sid="your_twilio_account_sid" twilio_from_number="your_twilio_phone_number" phone_numbers=("number1" "number2" "number3" "number4" "number5") send_twilio_alert() { for phone_number in "${phone_numbers[@]}" do curl -X POST "https://api.twilio.com/2010-04-01/Accounts/$twilio_sid/Messages.json" \ --data-urlencode "Body=Alert: The website $url is not responding!" \ --data-urlencode "From=$twilio_from_number" \ --data-urlencode "To=$phone_number" \ -u "$twilio_sid:$CRED_TWILIO" done } # Exponential notation is used to check if website is up or not attempt=1 while [ $attempt -le $max_attempts ] do response=$(curl -s -o /dev/null -w "%{http_code}" $url) if [ "$response" -eq 200 ]; then echo "Website is up!" exit 0 else echo "Attempt $attempt failed with response code $response. Waiting before retry..." sleep $((2**attempt)) fi attempt=$((attempt+1)) done echo "Website is down! Sending alert..." send_twilio_alert ``` # Automate PostgreSQL Database Snapshots with Periodic Jobs This use case will show you how to create a snapshot of [PostgreSQL](https://www.postgresql.org/) database using periodic jobs. For this example we will use [DSLR](https://github.com/mixxorz/DSLR) tool to create snapshot but there are other options you can use. Check installation guide in their readme. Let create a new block and create periodic task called `snapshot` and add the following script. ```bash # DATABASE_URL should be saved as credential or environment variable in RapidForge # I am placing it here to make example shorter export DATABASE_URL="postgresql://myuser:mypassword@localhost:5432/mydatabase" snapshot_name="snapshot-$(date +%Y%m%d%H%M%S)" dslr snapshot $snapshot_name ``` We can connect to any remote database, depending on the database you might need to create user and grant access. You can upload the snapshot to S3 or any other storage service by extending the script. By going to event tabs you can see the logs of the task. That should provide you enough information for auditing and troubleshooting. # Build a Slack Integration for Netbox Device Management [NetBox](https://netboxlabs.com/docs/netbox/en/stable/) is an open source web application designed to help manage and document computer networks. This use case will show you how to query device using Slack Application to query Netbox. For configuration of Slack application with OAuth please follow Youtube video [here](https://youtu.be/4qCA6XpPdT4). Lets create POST endpoint called `/webhook/netbox` inside of the block and add the following script. ```bash # Variables NETBOX_URL="https://your-netbox-instance/api" device_name=$FORM_TEXT # CRED_API_TOKEN is CRED saved in RapidForge instance response=$(curl -s -G \ -H "Authorization: Token $CRED_API_TOKEN" \ -H "Content-Type: application/json" \ --data-urlencode "name=$device_name" \ "$NETBOX_URL/dcim/devices/") device_count=$(echo "$response" | jq '.count') if [ "$device_count" -eq 0 ]; then echo "No device found with the name: $device_name" else echo "Device(s) found:" echo "$response" | jq '.results[] | {name: .name, id: .id, device_type: .device_type.display, site: .site.name}' fi ``` After Oauth configuration you need to define command in Slack Application's settings. Lets define command `/device` and put request url endpoint that you defined. With this we added Slack application to Netbox and we can use it to query Netbox. # Build a Web-Based Honeypot: Track and Analyze Attack Patterns In today's cybersecurity landscape understanding how attackers operate is critical. One effective method to gather this intelligence is by deploying [honeypots](https://en.wikipedia.org/wiki/Honeypot_(computing)), decoy systems that attract and study attackers without putting actual systems at risk. Honeypots simulate vulnerable or valuable resources and the interactions they gather can provide important insights for security teams. In this example, we'll focus on building a web based honeypot that can detect scanning, brute force attempts and unauthorized access attempts. One common attack vector is brute forcing login pages. We’ll create a fake admin login page designed to attract attackers. The page won’t authenticate users but will log every request, capturing details like the IP address headers, and attempted credentials. We can use RapidForge's drag and drop editor to create a simple page and POST endpoint to log the request. Simple login screen 
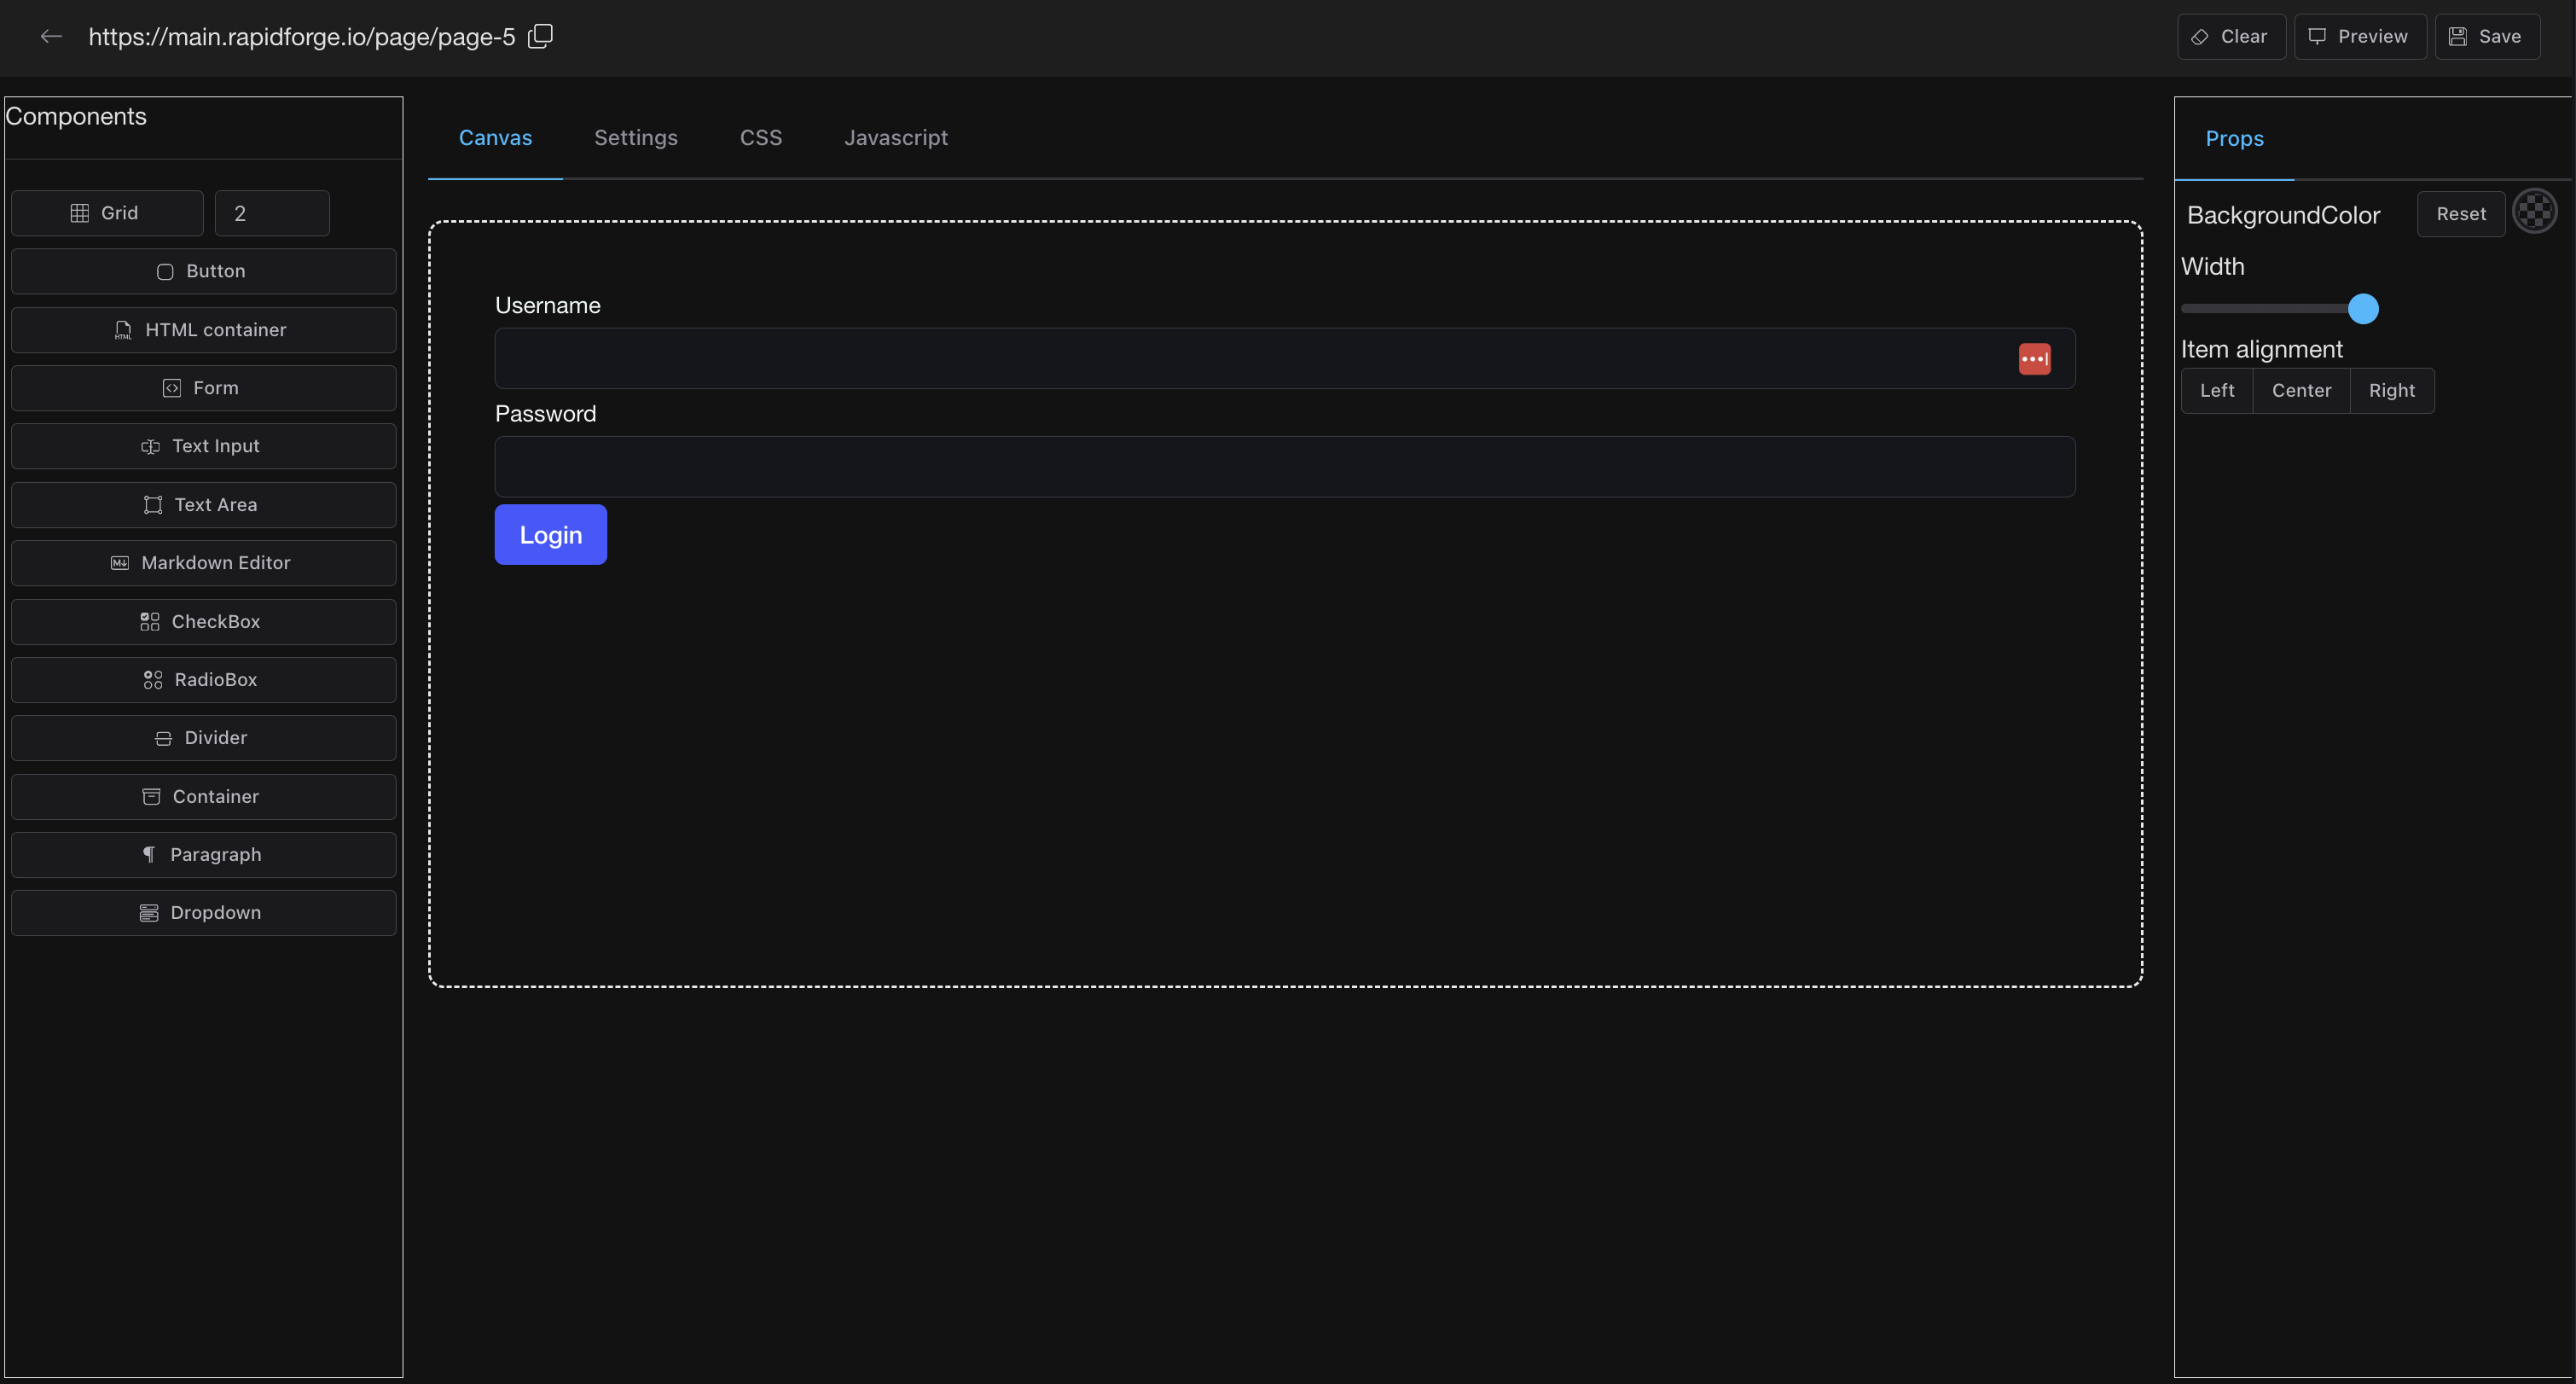
Create POST endpoint called `/webhook/login` inside of the block and add the following script. Don't forget to set form action to this endpoint. ```bash # Create JSON payload payload=$(cat < # Automate GitHub Issue Notifications in Slack & Discord We will show you how to create a program that checks given repo's github issues periodically and posts it to [Slack](https://slack.com/) if issues are found. First, just to make our lives easier, we will install [github cli](https://cli.github.com/) to our RapidForge instance. This will allow us to interact with GitHub API. Github cli requires token to authenticate with GitHub. You can create a token by going to your GitHub account settings and clicking on Developer settings. Then click on Personal access tokens and create a new token. Secondly create a periodic task and configure frequency that you want your issues to be checked. After that copy the Github token and save it to Periodic Task as environment variable. (GH_TOKEN). Final step is to create webhook for a channel in Slack. Follow [their documentation](https://api.slack.com/messaging/webhooks) to create webhook. Now we are ready to create our script. ```bash ISSUE_LIST=$(gh issue list --repo=rapidforge-io/release --state=open --json title,url) if [[ $ISSUE_LIST == [] ]] then echo "No open ISSUES found." exit 0 fi MESSAGE="Here are the current open PRs in rapidforge-io:\n" # Loop through the JSON data and format for row in $(echo "${ISSUE_LIST}" | jq -r '.[] | @base64'); do _jq() { echo ${row} | base64 --decode | jq -r ${1} } TITLE=$(_jq '.title') URL=$(_jq '.url') MESSAGE="${MESSAGE}\n*${TITLE}*: ${URL}" done # SLACK_WEBHOOK_URL is environment variable set in Periodic Task curl -X POST -H 'Content-type: application/json' --data "{\"text\": \"${MESSAGE}\"}" ${SLACK_WEBHOOK_URL} ``` Alternatively if you like to use [Discord](https://discord.com/) instead of Slack you can send message to Discord using webhooks. ```bash curl -H "Content-Type: application/json" -X POST -d "{\"content\": \"${MESSAGE}\"}" ${DISCORD_WEBHOOK_URL} ``` This example focused on Github issues but we can also use it to check unattended pull requests and send notifications to Slack to notify team about new PRs. # Create Slack application to check if given url is malicious through UrlScan.io This document will guide you step-by-step on how to create a Slack app for URL scanning using the RapidForge platform. We will use Slack and [UrlScan.io](https://urlscan.io/) to scan URLs and provide real-time feedback on the scanned links. ## Prerequisites Before we begin, ensure you have the following: - A Slack account - Account from urlscan.io ## Setting up a Slack OAuth app 1. Visit the [Slack API documentation](https://api.slack.com/authentication/oauth-v2) and follow the instructions to create a new OAuth app. 2. Once the app is created, copy the OAuth credentials (Client ID and Client Secret) and save them for later use. ## Setting up urlscan.io 1. Visit the [urlscan.io](https://urlscan.io/) website and sign up for a free account. 2. Once you've signed up, create a new API key and save it for later use. ## Saving the credentials Now that we have all the necessary credentials, we can save them in RapidForge. Open RapidForge and navigate to the Credentials section. Click on the Create New Credential button and select OAuth. Fill in the following fields: - **Name**: Slack - **Client ID**: Paste the Client ID from your Slack OAuth app - **Client Secret**: Paste the Client Secret from your Slack OAuth app - **Token URL**: https://slack.com/api/oauth.v2.access - **Authorization URL**: https://slack.com/oauth/v2/authorize - **Redirect URL**: https://rapidforge.io/oauth/callback (your instance URL) Click on the Save button to save the credentials. ## Saving the UrlScan.io credentials Next, we need to save the credentials for UrlScan.io. Open RapidForge and navigate to the Credentials section. Click on the Create New Credential button and select Text. Fill in the following fields: - **Name**: UrlScan - **Text**: Paste the API key from your urlscan.io account Click on the Save button to save the credentials. For the next step, you can follow this video to create a Slack app. # Build a Data Analytics API with DuckDB [DuckDB](https://duckdb.org/) is a fast, in-process SQL database that can query CSV, Parquet and JSON files directly no data loading required. Combined with RapidForge, you can create powerful analytics endpoints in minutes. ## Why DuckDB + RapidForge? - **Zero setup**: DuckDB is a single binary, just like RapidForge - **Query any file**: CSV, Parquet, JSON, even remote files over HTTP - **SQL power**: Full-featured SQL with aggregations, joins, and window functions - **No database server**: Runs in-process, perfect for air-gapped environments ## Use Case 1: Dynamic CSV Analytics Endpoint Create a webhook that queries a CSV file with dynamic filters using URL parameters. RapidForge automatically injects URL parameters as environment variables (`$URL_PARAM_`). Create a new block with a GET endpoint called `sales-report`: ```bash #!/bin/bash # URL: /webhooks/sales-report?category=Electronics&limit=10 # RapidForge injects: $URL_PARAM_CATEGORY, $URL_PARAM_LIMIT CATEGORY=${URL_PARAM_CATEGORY:-"all"} LIMIT=${URL_PARAM_LIMIT:-10} if [ "$CATEGORY" = "all" ]; then FILTER="" else FILTER="WHERE category = '${CATEGORY}'" fi duckdb -json -c " SELECT product_name, category, SUM(quantity) as total_sold, SUM(price * quantity) as revenue FROM 'data/sales.csv' ${FILTER} GROUP BY product_name, category ORDER BY revenue DESC LIMIT ${LIMIT} " ``` Now users can call: - `/webhooks/sales-report` - returns top 10 products across all categories - `/webhooks/sales-report?category=Electronics` - filter by category - `/webhooks/sales-report?category=Electronics&limit=5` - filter and limit results ## Use Case 2: Scheduled Data Report Create a periodic job that runs daily to generate a summary report and save it: ```bash #!/bin/bash # Daily sales summary - runs as a cron job REPORT_DATE=$(date +%Y-%m-%d) duckdb -c " COPY ( SELECT DATE_TRUNC('day', order_date) as date, COUNT(*) as orders, SUM(total) as revenue FROM 'data/orders.csv' WHERE order_date >= CURRENT_DATE - INTERVAL 7 DAY GROUP BY ALL ORDER BY date ) TO 'reports/weekly-summary-${REPORT_DATE}.csv' (HEADER, DELIMITER ',') " echo "Report generated: weekly-summary-${REPORT_DATE}.csv" ``` ## Use Case 3: Customer Dashboard with Drag-and-Drop Editor Build a complete analytics dashboard by combining DuckDB queries with RapidForge's drag-and-drop page editor. **Step 1:** Create a GET endpoint called `customer-stats` that joins multiple data files: ```bash #!/bin/bash # Join customers CSV with orders Parquet for a complete view # URL: /webhooks/customer-stats?min_value=1000 MIN_VALUE=${URL_PARAM_MIN_VALUE:-0} duckdb -json -c " SELECT c.name, c.email, c.signup_date, COUNT(o.order_id) as total_orders, SUM(o.amount) as lifetime_value FROM 'data/customers.csv' c JOIN 'data/orders.parquet' o ON c.id = o.customer_id GROUP BY c.name, c.email, c.signup_date HAVING lifetime_value > ${MIN_VALUE} ORDER BY lifetime_value DESC " ``` **Step 2:** Create a page using the drag-and-drop editor: 1. Go to **Pages** → **Create New Page** 2. Drag a **Table** component onto the canvas 3. In the **JS** tab, write plain JavaScript using fetch to hit the endpoint and populate the table: ```javascript // Fetch customer stats and populate the table async function loadCustomerData(minValue = 0) { const response = await fetch(`/webhooks/customer-stats?min_value=${minValue}`); const data = await response.json(); const table = document.getElementById('customer-table'); const tbody = table.querySelector('tbody'); tbody.innerHTML = ''; data.forEach(row => { const tr = document.createElement('tr'); tr.innerHTML = ` ${row.name} ${row.email} ${row.signup_date} ${row.total_orders} $${row.lifetime_value.toLocaleString()} `; tbody.appendChild(tr); }); } // Load data on page load loadCustomerData(); // Refresh button handler document.getElementById('refresh-btn').addEventListener('click', () => { const minValue = document.getElementById('min-value-input').value || 0; loadCustomerData(minValue); }); ``` 4. Add a **Text Input** component with id `min-value-input` for filtering by minimum value 5. Add a **Button** component with id `refresh-btn` to refresh the data The page editor lets you build interactive dashboards without writing frontend code—just connect your DuckDB-powered endpoints to UI components. ## Tips - Use `-json` flag to output JSON (perfect for API responses and connecting to the page editor) - Use `-csv` flag for CSV output - DuckDB can query S3 files directly with the `httpfs` extension - Combine with RapidForge's credential management to securely store database connection strings - URL parameters are always available as `$URL_PARAM_` in uppercase DuckDB's simplicity pairs perfectly with RapidForge—both are single binaries with zero dependencies, making them ideal for quick deployments and air-gapped environments. # Building a Self-Resetting Demo Environment with RapidForge When building developer tools, providing a live demo environment is crucial for potential users to experience your product without commitment. However, demo environments come with unique challenges: preventing abuse, managing data persistence and ensuring a consistent experience for every visitor. In this post, I'll walk through how we built a self-resetting demo environment for RapidForge using RapidForge itself a perfect example of "eating your own dog food." ## The Challenge We wanted to create a demo environment for RapidForge that: 1. **Requires no signup** - Users should be able to try it immediately with known credentials 2. **Resets automatically** - Data should refresh every 30 minutes to maintain consistency 3. **Prevents destructive actions** - Users shouldn't be able to delete the demo account or break the environment 4. **Shows clear warnings** - Visitors should understand this is temporary and not for production use ## The Solution: Demo Mode We implemented a dedicated "demo" mode in RapidForge that's activated simply by setting `RF_ENV=demo`. This approach keeps the demo logic cleanly separated from production code without requiring separate environment variables. ### Step 1: Adding Demo Mode Detection First, we added a simple helper method to our configuration: ```go // filepath: config/config.go func (c *Config) IsDemoMode() bool { return c.Env == "demo" } ``` This allows us to check `config.Get().IsDemoMode()` anywhere in the codebase. ### Step 2: Creating the Demo User In demo mode, we always want a user with credentials `test/test` to exist. We modified our user creation logic to handle this: ```go // filepath: models/user.go func (s *Store) CreateAdminUserIfNoUserExists() (*User, error) { if config.Get().IsDemoMode() { demoUser := &User{ Username: "test", PasswordHash: "test", Role: AdminRole, } existingUser, _ := s.GetUserByUsername("test") if existingUser == nil { if err := s.InsertUser(demoUser); err != nil { return nil, err } } else { demoUser.ID = existingUser.ID if err := s.UpdateUser(demoUser); err != nil { return nil, err } } return demoUser, nil } // Normal mode: create admin user if no users exist // ... existing code ... } ``` This ensures that every time the demo environment starts (or restarts), the test user exists with the correct password. ### Step 3: Restricting Destructive Operations Demo environments need guardrails. We added checks to prevent users from: - Creating new users - Updating existing users (including changing passwords) - Deleting users - Accessing the terminal (security risk) Here's an example from the user update handler: ```go // filepath: handlers.go func (env *Env) updateUserHandler(c *gin.Context) { if config.Get().IsDemoMode() { c.HTML(http.StatusForbidden, "users.html", gin.H{ "alertBox": utils.AlertBox(utils.Error, "User management is disabled in demo mode"), }) return } // ... existing code ... } ``` We applied similar guards to `createUserHandler`, `deleteUserHandler`, and the terminal handlers. ### Step 4: Adding Visual Indicators Users need to know they're in a demo environment. We added a prominent warning banner on the login page: ```html {{if .isDemoMode}} Demo Environment
This environment automatically resets every 30 minutes.
Login with: test / test
⚠️ All changes are temporary and will not persist.
{{end}} ``` ### Step 5: Deploying to Fly.io We created a separate [Fly.io](https://fly.io/) configuration specifically for the demo environment: ```toml # filepath: fly.demo.toml app = 'rapidforge-demo' primary_region = 'lhr' [env] RF_ENV = "demo" RF_PORT = ":8080" RF_DOMAIN = "rapidforge-demo.fly.dev" RF_CLOUD = "true" RF_TERM = "false" # Disable terminal in demo [http_service] internal_port = 8080 force_https = true auto_stop_machines = 'off' auto_start_machines = true min_machines_running = 0 [[vm]] memory = '1gb' cpu_kind = 'shared' cpus = 1 ``` Deployment is straightforward: ```bash # Create the app fly apps create rapidforge-demo # Create storage volume fly volumes create rapidforge_demo_data --region lhr --size 1 --app rapidforge-demo # Deploy fly deploy --config fly.demo.toml ``` ## The Meta Solution: Using RapidForge to Manage RapidForge Here's where it gets interesting. We needed a way to restart the demo environment every 30 minutes to reset the database. Instead of using external cron services or GitHub Actions, we used **RapidForge itself** to manage this task. ### Creating the Restart Script We created a bash script that uses the Fly.io API to restart the demo machine: ```bash # we configured FLY_TOKEN via UI credentials # scree and RapidForge injects it as env variable FLY_API_TOKEN="${CRED_FLY_TOKEN}" APP_NAME="rapidforge-demo" echo "$(date): Starting restart process for $APP_NAME" MACHINES=$(curl -s -X GET \ -H "Authorization: Bearer $FLY_API_TOKEN" \ "https://api.machines.dev/v1/apps/$APP_NAME/machines") MACHINE_IDS=$(echo "$MACHINES" | jq -r '.[].id') for MACHINE_ID in $MACHINE_IDS; do echo "Restarting machine: $MACHINE_ID" curl -X POST \ -H "Authorization: Bearer $FLY_API_TOKEN" \ "https://api.machines.dev/v1/apps/$APP_NAME/machines/$MACHINE_ID/restart" done echo "$(date): Demo restart completed" ``` ### Setting Up the Periodic Task In our production RapidForge instance, we: 1. **Stored the Fly.io API token** as a credential named `FLY_TOKEN` 2. **Created a periodic task** with: - **Schedule**: `*/30 * * * *` (every 30 minutes) - **Script**: The restart script above - **Script Type**: Bash Now RapidForge automatically restarts its own demo environment every 30 minutes. No external dependencies, no additional services - just RapidForge managing RapidForge. ### Optional: Configure an "On Fail" handler to notify on restart failures If the restart script itself fails (for example Fly.io API errors or networking issues), you can configure an **On Fail** script on the periodic task to send a Discord notification so you get alerted immediately. RapidForge provides these environment variables to the on-fail script: `FAILURE_EXIT_CODE`, `FAILURE_OUTPUT`, `FAILURE_ERROR`, and `TASK_ID`. Paste the following into the periodic task's **On Fail** script field (make sure `DISCORD_WEBHOOK` is configured in your block credentials): ```bash ERROR_MSG="${FAILURE_ERROR:-$FAILURE_OUTPUT}" ERROR_TRUNC=$(printf "%s" "$ERROR_MSG" | head -c 1800) if [ -n "$DISCORD_WEBHOOK" ]; then curl -X POST -H 'Content-type: application/json' \ --data "{\"content\":\"❌ **Demo Restart Failed**\\n**Task ID:** ${TASK_ID}\\n**Exit Code:** ${FAILURE_EXIT_CODE}\\n\\n\`\`\`${ERROR_TRUNC}\`\`\`\"}" \ "$DISCORD_WEBHOOK" fi ``` ## Key Takeaways 1. **Environment-based configuration is powerful** - Using `RF_ENV=demo` instead of a separate flag keeps things simple 2. **Self-hosting demo management is viable** - Using your own product to manage its demo is both practical and validating 3. **Guard rails are essential** - Restricting destructive operations prevents abuse while maintaining functionality 4. **Clear communication matters** - Visual indicators help users understand what they're working with 5. **SQLite + machine restarts = easy resets** - No need for complex snapshot/restore logic The entire implementation took just a few hours and gives potential users a safe, consistent way to explore RapidForge without any commitment. ## Try It Yourself Want to see it in action? Visit our demo at https://rapidforge-demo.fly.dev/blocks/ # Automated Database Backups with S3 Upload and Notifications Managing database backups is critical for any production system, but setting up automated backup pipelines can be complex and time consuming. This use case demonstrates how to use RapidForge's periodic tasks to create a complete backup automation system that: - Creates compressed database backups on schedule - Uploads backups to AWS S3 for secure storage - Sends notifications to Slack or Discord on success/failure - Automatically cleans up old backups based on retention policy All of this is accomplished with a single bash script running in RapidForge's periodic task. ## Prerequisites - PostgreSQL or MySQL database - AWS account with S3 bucket created - AWS CLI installed on the RapidForge host - Slack webhook URL or Discord webhook URL (optional, for notifications) ## Step 1: Set Up Environment Variables Before creating the periodic task, configure your credentials and settings in RapidForge: 1. Navigate to your block's **Settings** section 2. Add the following environment variables: - `DATABASE_URL` - Your database connection string (e.g., `postgresql://user:pass@host:5432/dbname`) - `S3_BUCKET` - Your S3 bucket name (e.g., `my-db-backups`) - `AWS_ACCESS_KEY_ID` - Your AWS access key - `AWS_SECRET_ACCESS_KEY` - Your AWS secret key - `AWS_DEFAULT_REGION` - Your AWS region (e.g., `us-east-1`) - `SLACK_WEBHOOK` - Your Slack webhook URL (optional) - `BACKUP_RETENTION_DAYS` - Number of days to keep backups (e.g., `30`) > **Tip**: Use RapidForge's credential storage for sensitive values like database passwords and AWS keys. They will be accessible in your scripts with `CRED_` prefix ## Step 2: Create the Periodic Task 1. Go to your block 2. Click **Create Periodic Task** 3. Set the schedule (e.g., `0 2 * * *` for daily at 2 AM) 4. Add the following bash script: ### For PostgreSQL: ```bash #!/bin/bash set -e # Generate backup filename with timestamp TIMESTAMP=$(date +%Y%m%d_%H%M%S) BACKUP_FILE="backup_${TIMESTAMP}.sql.gz" LOCAL_PATH="/tmp/${BACKUP_FILE}" # Create compressed database backup echo "Creating backup: ${BACKUP_FILE}" pg_dump "$DATABASE_URL" | gzip > "$LOCAL_PATH" BACKUP_SIZE=$(du -h "$LOCAL_PATH" | cut -f1) echo "Backup created successfully: ${BACKUP_SIZE}" # Upload to S3 echo "Uploading to S3..." aws s3 cp "$LOCAL_PATH" "s3://${S3_BUCKET}/${BACKUP_FILE}" --storage-class STANDARD_IA echo "Upload successful" # Send success notification if [ -n "$SLACK_WEBHOOK" ]; then curl -X POST -H 'Content-type: application/json' \ --data "{\"text\":\"✅ Database backup completed successfully\\nFile: ${BACKUP_FILE}\\nSize: ${BACKUP_SIZE}\"}" \ "$SLACK_WEBHOOK" fi # Clean up local file rm "$LOCAL_PATH" # Delete old backups based on retention policy if [ -n "$BACKUP_RETENTION_DAYS" ]; then echo "Cleaning up backups older than ${BACKUP_RETENTION_DAYS} days..." CUTOFF_DATE=$(date -d "${BACKUP_RETENTION_DAYS} days ago" +%Y%m%d 2>/dev/null || date -v-${BACKUP_RETENTION_DAYS}d +%Y%m%d) aws s3 ls "s3://${S3_BUCKET}/" | grep "backup_" | while read -r line; do FILE_DATE=$(echo $line | grep -oE "[0-9]{8}" | head -1) FILE_NAME=$(echo $line | awk '{print $4}') if [ "$FILE_DATE" -lt "$CUTOFF_DATE" ]; then echo "Deleting old backup: ${FILE_NAME}" aws s3 rm "s3://${S3_BUCKET}/${FILE_NAME}" fi done fi echo "Backup automation completed" ``` ### For MySQL: ```bash #!/bin/bash set -e # Parse MySQL connection details from DATABASE_URL # Format: mysql://user:password@host:port/database DB_USER=$(echo $DATABASE_URL | sed -n 's/.*:\/\/\([^:]*\):.*/\1/p') DB_PASS=$(echo $DATABASE_URL | sed -n 's/.*:\/\/[^:]*:\([^@]*\)@.*/\1/p') DB_HOST=$(echo $DATABASE_URL | sed -n 's/.*@\([^:]*\):.*/\1/p') DB_PORT=$(echo $DATABASE_URL | sed -n 's/.*:\([0-9]*\)\/.*/\1/p') DB_NAME=$(echo $DATABASE_URL | sed -n 's/.*\/\(.*\)/\1/p') TIMESTAMP=$(date +%Y%m%d_%H%M%S) BACKUP_FILE="backup_${TIMESTAMP}.sql.gz" LOCAL_PATH="/tmp/${BACKUP_FILE}" # Create compressed database backup echo "Creating MySQL backup: ${BACKUP_FILE}" mysqldump -h"$DB_HOST" -P"$DB_PORT" -u"$DB_USER" -p"$DB_PASS" "$DB_NAME" | gzip > "$LOCAL_PATH" BACKUP_SIZE=$(du -h "$LOCAL_PATH" | cut -f1) echo "Backup created successfully: ${BACKUP_SIZE}" # Upload to S3 echo "Uploading to S3..." aws s3 cp "$LOCAL_PATH" "s3://${S3_BUCKET}/${BACKUP_FILE}" --storage-class STANDARD_IA echo "Upload successful" # Send success notification if [ -n "$SLACK_WEBHOOK" ]; then curl -X POST -H 'Content-type: application/json' \ --data "{\"text\":\"✅ Database backup completed successfully\\nFile: ${BACKUP_FILE}\\nSize: ${BACKUP_SIZE}\"}" \ "$SLACK_WEBHOOK" fi # Clean up local file rm "$LOCAL_PATH" echo "Backup automation completed" ``` ## Step 3: Configure Failure Notifications RapidForge allows you to set up an "On Fail" script that automatically runs when a periodic task or webhook fails. This is perfect for sending failure notifications without cluttering your main script with error handling. 1. In your periodic task settings, find the **On Fail** section 2. Enable the on-fail handler 3. Add the following script: ### Slack Notification: ```bash #!/bin/bash # RapidForge automatically provides these environment variables on failure: # - FAILURE_EXIT_CODE: The exit code from the failed task # - FAILURE_OUTPUT: Standard output from the failed task # - FAILURE_ERROR: Standard error from the failed task # - TASK_ID: The ID of the failed task if [ -n "$SLACK_WEBHOOK" ]; then ERROR_MSG="${FAILURE_ERROR:-$FAILURE_OUTPUT}" curl -X POST -H 'Content-type: application/json' \ --data "{\"text\":\"❌ Database Backup Failed\\n*Task ID:* ${TASK_ID}\\n*Exit Code:* ${FAILURE_EXIT_CODE}\\n\\n\`\`\`${ERROR_MSG}\`\`\`\"}" \ "$SLACK_WEBHOOK" fi ``` ## Step 4: Test the Backup After creating the periodic task: 1. Check the **Events** tab to view logs and verify the backup was created successfully 2. Verify the backup file appears in your S3 bucket 3. Check your Slack/Discord channel for the notification ## Step 5: Monitoring and Maintenance RapidForge provides several ways to monitor your backup automation: - **Events Tab**: View detailed logs of each backup execution - **Notifications**: Receive instant alerts on Slack/Discord for failures - **S3 Console**: Verify backups are being created and retained correctly ### Encryption Add GPG encryption before uploading to S3: ```bash # Encrypt the backup gpg --symmetric --cipher-algo AES256 --passphrase "$BACKUP_PASSWORD" "$LOCAL_PATH" ENCRYPTED_FILE="${LOCAL_PATH}.gpg" # Upload encrypted file aws s3 cp "$ENCRYPTED_FILE" "s3://${S3_BUCKET}/${BACKUP_FILE}.gpg" ``` This approach gives you enterprise grade backup automation with minimal setup and maximum flexibility, all managed through RapidForge's intuitive interface.
# Contact Form This use case will show you how to create contact form for your website. RapidForge website uses [contact form](https://rapidforge.io/contact-feedback/) created by RapidForge. Lets create page using drag and drop editor. You can see page created in [contact-form](https://rapidforge.io/page/contact-feedback) page. We should create endpoint for form to be submitted. Lets create POST endpoint called `/webhook/feedback` inside of the block and add the following script. ```bash # Create JSON payload # FORM_ is injected by RapidForge from form fields # You can access request body using PAYLOAD_DATA payload=$(cat < # Invoke AWS Lambda Functions Directly: No API Gateway Required [AWS Lambda](https://aws.amazon.com/pm/lambda/?trk=76a71f91-93bb-4d85-88df-f4e75830bd57&sc_channel=ps&s_kwcid=AL!4422!10!71605931228209!71606456551442&ef_id=f4da7fac719418b5454e18b9151e3e15:G:s) is a popular serverless computing platform, but many users tend to rely on [API Gateway](https://docs.aws.amazon.com/lambda/latest/dg/services-apigateway-tutorial.html) to invoke their Lambda functions via HTTP requests. While API Gateway is highly integrated with Lambda, it can sometimes be overkill or incur additional costs depending on your specific use case. In this post, we'll explore an alternative way to invoke Lambda functions using RapidForge. With RapidForge, you can avoid the overhead of API Gateway by using its webhook and periodic task features to invoke AWS Lambda functions directly from bash scripts. This approach provides a lightweight solution for running Lambda functions in response to HTTP requests or on a periodic schedule, without needing to build a full API Gateway integration. #### Prerequisites - An AWS account with Lambda functions already set up. - AWS CLI installed and configured on the server running RapidForge. - You can set `AWS_ACCESS_KEY_ID`, `AWS_SECRET_ACCESS_KEY` and `AWS_DEFAULT_REGION` environment varibles for specific webhook or block #### Step 1: Create a Webhook in RapidForge To invoke a Lambda function via HTTP requests, start by creating a webhook in RapidForge. 1. Log in to RapidForge. 2. Navigate to the **Webhooks** section inside of the block. 3. Click on **Create New Webhook**. 4. Give the webhook a name (e.g., `InvokeLambdaWebhook`). 5. Define the HTTP method (GET, POST, etc.) and URL path that will trigger this webhook. #### Step 2: Write a Bash Script to Invoke Lambda Once the webhook is created, you need to attach a bash script that will execute when the webhook is triggered. This script will use the AWS CLI to call the Lambda function. You can inject environment variables from the request context into this script to pass data dynamically. Here’s an example bash script that invokes a Lambda function: ```bash # You can set this as env variable a well LAMBDA_FUNCTION_NAME="MyLambdaFunction" # Call the Lambda function using AWS CLI, super simple! aws lambda invoke \ --function-name "$LAMBDA_FUNCTION_NAME" \ --payload "$PAYLOAD_DATA" \ /dev/stdout | jq -r '.body' ``` If you need to invoke Lambda functions on a schedule instead of via webhooks, RapidForge’s **Periodic Tasks** feature can help. 1. Go to the **Periodic Tasks** section in RapidForge. 2. Create a new task, specifying the schedule (e.g., every hour, every day, etc.). 3. Attach a similar bash script to the task that uses the AWS CLI to invoke the Lambda function. 4. Set environment variables as needed for the task. This way, RapidForge will automatically trigger the Lambda function at regular intervals, without the need for an HTTP request or API Gateway. This approach is especially useful for those who prefer to avoid the complexity of setting up API Gateway or need more control over how Lambda functions are invoked.
Use cases

Practical things people build with RapidForge.

Contact forms, alerts, demo environments, backups, and other low-friction internal workflows.

{%- for post in collections.use_cases -%} {%- endfor -%}
If bash script is not enough you can use [other languages](https://www.youtube.com/watch?v=SxBTltlio8I) with RapidForge. However, those require you to install dependencies on host machine. If you don't want to do that RapidForge comes with its own embedded [Lua](https://www.lua.org/) Vm. Note that RapidForge will priorities Lua Vm if that is installed on host machine. That will be useful in case native dependencies you would like to use with Lua. Embeded Lua Vm has libraries that you can use as well. # RapidForge Lua Libraries - `json.lua` — [JSON encoder/decoder]( https://github.com/rxi/json.lua) (MIT, by rxi) - `http.lua` — Minimal HTTP client built on top of curl ## Loading the modules ```lua local json = require("json") local http = require("http") ``` ## json.lua API - `json.encode(value) -> string` - Encodes Lua values into JSON. - Tables with sequential numeric keys are arrays; string-keyed tables are objects. - Errors on sparse arrays, mixed keys, or non-finite numbers. - `json.decode(str) -> any` - Decodes a JSON string into Lua values. - Errors on invalid JSON or trailing data. Example: ```lua local payload = { hello = "world", nums = {1,2,3} } local s = json.encode(payload) local t = json.decode(s) ``` ## http.lua API All functions return two values: response body (string or nil) and HTTP status code (number, or 0 on failure). - `http.get(url, headers?) -> body, status` - `http.delete(url, headers?) -> body, status` - `http.post(url, data?, headers?) -> body, status` - `http.put(url, data?, headers?) -> body, status` Headers are provided as a Lua table of `["Header-Name"] = "value"`. Examples: ```lua local body, status = http.get( "https://httpbin.org/get", { ["User-Agent"] = "rapidforge/luarunner", Accept = "application/json" } ) local payload = json.encode({ hello = "world" }) local body, status = http.post( "https://httpbin.org/post", payload, { ["Content-Type"] = "application/json" } ) if status == 200 or status == 201 then local obj = json.decode(body) print(obj.json.hello) else io.stderr:write("request failed: ", status, "\n") end local token = os.getenv("TOKEN") local _, status = http.delete( "https://httpbin.org/delete", { Authorization = "Bearer " .. token } ) ``` RapidForge binary can be used as simple key value store. That will help you to store and retrieve information in your scripts easily. ```./rapidForge --help``` will show you how to use it. Under the hood it uses sqlite3 database with a table called KV. Ofcourse you can always use other storage options like [postgresql](https://www.postgresql.org/), [duckdb](https://duckdb.org/) or [badger](https://docs.hypermode.com/badger/overview) Please check out Youtube video for more information. # Install You can download RapidForge binaries from the [Releases](https://github.com/rapidforge-io/release) page. If you need binaries for other platforms, feel free to contact us. RapidForge is free to use and requires no external dependencies. You can either run the binary directly or use a Docker image. For internal purposes, we use the following Docker image, but you’re free to use any image that includes the tools you need.

Quick install

Copy the command below to install RapidForge in one step.

```dockerfile FROM debian:latest # sqlite3 is required if you want Key-Value store to work RUN apt-get update && apt-get install -y \ ca-certificates \ curl \ jq \ sqlite3 \ tar \ && rm -rf /var/lib/apt/lists/* WORKDIR /app # Fetch the latest version dynamically from GitHub ARG ARCH="x86_64" ARG PLATFORM="Linux" ARG BINARY_NAME="rapidforge" RUN VERSION=$(curl -s https://api.github.com/repos/rapidforge-io/release/releases/latest | jq -r '.tag_name') && \ TARBALL="${BINARY_NAME}_${PLATFORM}_${ARCH}.tar.gz" && \ curl -L "https://github.com/rapidforge-io/release/releases/download/${VERSION}/${TARBALL}" -o ${TARBALL} && \ tar -xzvf ${TARBALL} && \ chmod +x ${BINARY_NAME} && \ rm ${TARBALL} ARG PORT=8080 ENV RF_PORT=$PORT EXPOSE ${PORT} CMD ["./rapidforge"] ```
# Configuration RapidForge is minimally configured software. When RapidForge is ran for the first time it will create username and password for admin user. This will be printed out in logs **only for the first time**. After that its high recommended to change the password. RapidForge allows user to retrying login only for 5 times. After that user will be forced out of the system. In order to gain access user needs to contact with another admin to restart retries vai user panel. | Environment Variable | Default Value | Description | |----------------------|----------------------|------------------------------------| | `RF_DATABASE_URL` | `rapidforge.sqlite3` | Database URL | | `RF_KV_URL` | None | Key-Value store URL | | `RF_DOMAIN` | `localhost` | Domain name | | `RF_PORT` | `:4000` | Port number | | `TLS_CERT` | None | PEM-encoded certificate data | | `RF_TERM` | None | Enable [web terminal](https://www.youtube.com/watch?v=ecNMF8rQcbE) for admin | # OpenTelemetry Configuration RapidForge supports [OpenTelemetry](https://opentelemetry.io/) for distributed tracing and metrics collection. All configuration is done through environment variables with the `RF_OTEL_` prefix. ### Core Settings | Variable | Description | Default | Required | |----------|-------------|---------|----------| | `RF_OTEL_ENABLED` | Enable/disable OpenTelemetry | `false` | Yes | | `RF_OTEL_ENDPOINT` | OTLP collector endpoint (without protocol prefix) | `localhost:4317` | No | | `RF_OTEL_SERVICE_NAME` | Service identifier in traces/metrics | `rapidforge` | No | | `RF_OTEL_SERVICE_VERSION` | Service version | (auto-detected) | No | | `RF_OTEL_ENVIRONMENT` | Deployment environment | `RF_ENV` or `production` | No | ### Exporter Configuration | Variable | Description | Default | Options | |----------|-------------|---------|---------| | `RF_OTEL_EXPORTER_TYPE` | Type of exporter | `otlp` (or `stdout` in dev) | `otlp`, `stdout`, `none` | | `RF_OTEL_EXPORTER_PROTOCOL` | OTLP protocol | `http` | `grpc`, `http` | | `RF_OTEL_INSECURE` | Disable TLS verification | `false` | `true`, `false` | | `RF_OTEL_HEADERS` | Additional headers (comma-separated key=value pairs) | - | e.g., `api-key=secret,auth=token` | ### Trace Configuration | Variable | Description | Default | Options | |----------|-------------|---------|---------| | `RF_OTEL_TRACES_SAMPLER` | Sampling strategy | `parentbased_always_on` | | | `RF_OTEL_TRACES_SAMPLER_ARG` | Sampling ratio (0.0 to 1.0) | `1.0` | Float between 0 and 1 | ### Metrics Configuration | Variable | Description | Default | |----------|-------------|---------| | `RF_OTEL_METRICS_ENABLED` | Enable metrics collection | `true` | ### Honeycomb example ```bash export RF_OTEL_ENABLED=true export RF_OTEL_ENDPOINT=api.honeycomb.io export RF_OTEL_EXPORTER_PROTOCOL=http export RF_OTEL_HEADERS="x-honeycomb-team=" export RF_OTEL_SERVICE_NAME=rapidforge export RF_OTEL_ENABLED=true export RF_OTEL_ENDPOINT=otel-collector:4317 export RF_OTEL_TRACES_SAMPLER=parentbased_traceidratio ``` # Update You can use the `./rapidforge` binary to manage and update RapidForge. Run `./rapidforge --help` to view all available commands. To update RapidForge to the latest version, use: `./rapidforge update` This command will automatically download the latest version and back up your existing installation. Note that the update process does not start the new version automatically, since your system configuration may vary. It’s up to your operations team to decide how to start the new version. # Environment Variables Users can configure environment variables to be used in scripts. There are few places user can set environment variables. **Block level environment variables** can be set in block settings. This will be applied to all endpoints and periodic tasks. **Endpoint level environment** variables can be set in endpoint settings. This will be applied to that specific endpoint only. **Periodic task level environment** variables can be set in periodic task settings. This will be applied to that specific periodic task only. Environment variables that is set in Periodic task and Endpoint settings will override Block level environment variables. # RapidForge is built to be straightforward and easy to use. Here are the core concepts: ## Blocks Blocks group related endpoints, pages, and tasks together for easier management. ## Endpoints Endpoints in RapidForge are customizable HTTP webhooks set up in the format /webhooks/. They can be configured to handle specific request methods, such as POST or GET and offer flexibility to adjust various aspects, like returning custom headers, setting status codes and more. **Authentication:** You can now configure authentication directly on endpoints, eliminating the need to handle auth logic in your implementation scripts. This makes securing your endpoints simpler and more declarative. **Copy to cURL:** Each endpoint includes a "Copy to cURL" button, allowing you to quickly copy the endpoint as a cURL command for testing or sharing. You can implement these endpoints using Bash or Lua scripts, with RapidForge automatically injecting useful environment variables into your scripts. ## Pages RapidForge features a drag and drop editor for easily creating web pages. Build forms and other content, then customize them with your own JavaScript and CSS. You can connect forms to API endpoints and automatically send form data to your scripts for processing. **Common use cases:** - **Contact forms** - Create a contact form that sends submissions to your Slack channel or email - **Feedback surveys** - Build feedback forms that store responses in your database - **Admin dashboards** - Create internal tools to trigger scripts or view system status The drag and drop editor lets you build these pages visually, while the ability to add custom CSS and JavaScript gives you full control over styling and interactivity. ## Periodic Tasks (Cronjobs) Periodic tasks are scheduled actions configured with cron syntax to run at specific times or on designated days. Audit records are available to verify proper execution. **Common use cases:** - **Health checks** - Monitor your services every 5 minutes and send alerts if they're down - **Data backups** - Schedule nightly database backups to cloud storage - **Report generation** - Generate and email weekly reports every Monday at 9 AM - **Cleanup jobs** - Delete old logs or temporary files daily at midnight - **API sync** - Fetch data from external APIs hourly and update your systems ## Email (Coming Soon) Set up periodic email checks and trigger workflows based on specific email events. For example, send Slack alerts to your security team if an email contains malicious content. # Credentials RapidForge supports two credential types. **Text credentials** these are simple text credentials that can be used in scripts. They will be injected to your scripts as environment variables. You can reach out to them using `CRED_{CREDENTIAL_NAME}` format. **Oauth credentials** these are credentials that you can save by creating Oauth flow with 3rd party services. RapidForge will provide you a callback address and few other parameters for users to configure the Oauth flow. Once flow is configured, access token is saved and if refresh token is available access token will be updated periodically. You can use the access token in scripts just like text credentials.
## Tines Overview [Tines](https://www.tines.com/) is a low-code automation platform primarily targeting security and IT teams. It's designed for SOAR (Security Orchestration, Automation, and Response) workflows like incident response, threat intelligence and security operations. Tines offers a visual story builder with drag-and-drop actions, built-in data manipulation through spreadsheet-like formulas and collaboration features like shared notes and multiplayer mode for team based workflow development. It provides a free community edition on cloud with limited features and paid enterprise plans with on-premise deployment options. ## RapidForge Overview RapidForge is an open source platform (Apache 2.0 license) designed for building applications and automating workflows across various industries, rather than focusing solely on security automation. It allows automation using Bash or [Lua](https://www.lua.org/) scripts that integrate directly into the platform. RapidForge features a drag-and-drop editor for designing web pages and internal applications. It's a completely free, self-hosted platform that deploys as a single binary with zero dependencies. ## Key Differences | Feature | RapidForge | Tines | |---------|-----------|-------| | **Primary Focus** | General internal tools & automation | Security automation (SOAR) | | **Pricing** | Open source & free (Apache 2.0) | Free community tier; enterprise pricing | | **Deployment** | Single binary, self-hosted | Cloud or on-premise (enterprise) | | **Automation Style** | Bash/Lua scripts | Visual story builder with actions | | **Dependencies** | Zero dependencies | Cloud infrastructure or complex on-prem setup | | **UI Building** | Drag-and-drop page editor | Workflow pages and forms | | **Data Manipulation** | Via scripts | Built-in formulas (spreadsheet-like) | | **Collaboration** | Self-hosted teams | Multiplayer mode, shared notes | | **Air-gap Support** | Native support | Enterprise feature | | **Target Industry** | Cross-industry | Security & IT teams | ## When to Choose RapidForge - You need automation beyond just security workflows - You want a completely free, self-hosted solution - You prefer scripting (Bash/Lua) over visual builders - You need lightweight deployment with zero dependencies - You're working in air-gapped environments - You want to build web interfaces alongside automations ## When to Choose Tines - Your primary focus is security automation (SOAR) - Your team prefers visual, no-code workflow building - You want spreadsheet-like formulas for data manipulation - You need real-time collaboration features (multiplayer mode) - You prefer a managed cloud solution for security workflows ## Conclusion Tines excels as a specialized SOAR platform for security and IT teams with its visual story builder and security-focused templates. RapidForge offers a more general purpose platform for building internal tools and automations across any industry with the advantage of being completely free and simple to deploy. Choose Tines for dedicated security automation; choose RapidForge for versatile internal tool development with scripting flexibility.
## Windmill Overview [Windmill](https://www.windmill.dev/) is a comprehensive, enterprise-grade workflow engine and developer platform backed by Y Combinator. It supports scripting in 20+ languages including Python, TypeScript, Go, PHP, Rust, Bash, C#, and SQL. Windmill offers a full-featured WebIDE, flow orchestrator and app builder with low-code capabilities. It's designed for large-scale deployments with features like worker groups, Git-based collaboration, SOC 2 Type II compliance, RBAC, SSO, and extensive integrations with databases and cloud platforms. ## RapidForge Overview RapidForge is an open source platform (Apache 2.0 license) that takes a minimalist approach as a single binary web server with zero external dependencies. It focuses on simplicity by supporting Bash and Lua scripts, making it ideal for teams that want to quickly turn scripts into webhooks, cron jobs, and web pages without framework overhead. RapidForge is self-hosted and particularly suited for air-gapped environments. ## Key Differences | Feature | RapidForge | Windmill | |---------|-----------|----------| | **Deployment** | Single binary, zero dependencies | Docker/Kubernetes, requires PostgreSQL | | **Languages** | Bash, Lua | Python, TypeScript, Go, PHP, Rust, Bash, C#, SQL (20+) | | **Setup Time** | Minutes (one command) | Longer setup with more configuration | | **Pricing** | Open source & free (Apache 2.0) | Free tier + paid enterprise plans | | **Target Users** | Small teams, DevOps, sysadmins | Enterprise teams, data engineers | | **Complexity** | Lightweight, minimal | Feature-rich, comprehensive | | **Air-gap Support** | Native support | Enterprise feature | | **Visual Flow Builder** | Basic UI | Advanced low-code flow orchestrator | | **App Builder** | Drag-and-drop page editor | Full low-code app builder | ## When to Choose RapidForge - You need a lightweight solution that deploys in one command - Your automation tasks primarily involve Bash or Lua scripts - You're working in air-gapped or restricted environments - You prefer simplicity over extensive features - You want a completely free, self-hosted solution without enterprise tiers - You need to quickly expose existing CLI tools as webhooks or scheduled tasks ## When to Choose Windmill - You need support for multiple programming languages (Python, TypeScript, Go, etc.) - You require enterprise features like RBAC, SSO, and SOC 2 compliance - You need extensive third-party integrations (100+ APIs) - You have a large team requiring Git-based collaboration workflows - You need advanced monitoring and observability features ## Conclusion RapidForge excels at simplicity and rapid deployment turning scripts into production ready endpoints with minimal setup. Windmill offers a more comprehensive platform for enterprise scale operations with extensive language support and collaboration features. Choose RapidForge when you value simplicity and speed; choose Windmill when you need a full featured workflow engine with enterprise capabilities.
# How RapidForge is alternative to n8n [n8n](https://n8n.io/) and RapidForge both enable workflow automation, but they approach the problem from different angles and serve different primary use cases. ## n8n Overview n8n is a popular open source workflow automation tool with a visual node-based editor. It specializes in connecting various services through 400+ pre-built integrations (nodes) including Slack, Google Sheets, Airtable and many SaaS applications. n8n offers both cloud-hosted and self-hosted options, with the self-hosted version requiring Docker and a database setup. ## RapidForge Overview RapidForge is an open source development platform (Apache 2.0 license) that goes beyond workflow automation. It provides a complete solution for building custom applications, web interfaces, webhooks and scheduled tasks—all packaged in a single, self-hosted binary with zero external dependencies. RapidForge uses Bash and Lua scripts for business logic rather than visual node connections. ## Key Differences | Feature | RapidForge | n8n | |---------|-----------|-----| | **Approach** | Script-based (Bash/Lua) | Visual node-based editor | | **Deployment** | Single binary, zero dependencies | Docker + database required | | **Pre-built Integrations** | CLI tools, any API via scripts | 400+ native nodes | | **Pricing** | Open source & free (Apache 2.0) | Free self-hosted; cloud plans from $20/month | | **UI Building** | Drag-and-drop page editor | Limited (workflow forms) | | **Webhook Support** | Native, instant setup | Native support | | **Scheduling** | Built-in cron jobs | Built-in scheduling | | **Air-gap Support** | Native support | Possible but complex | | **Learning Curve** | Scripting knowledge | Visual, low-code | ## When to Choose RapidForge - You need to build web interfaces alongside automations - You prefer writing scripts over visual workflow builders - You need a lightweight, dependency-free deployment - You're working in air-gapped or isolated environments - You want to expose existing CLI tools as APIs - You need a completely free solution ## When to Choose n8n - You need quick integrations with popular SaaS tools - Your team prefers visual, drag-and-drop workflow building - You want pre-built connectors for services like Slack, Notion, or Airtable ## Conclusion n8n excels at connecting SaaS applications through its extensive library of pre-built integrations and visual workflow editor. RapidForge provides a broader platform for building complete internal tools including web UIs, APIs, and automations using familiar scripting languages.
# How RapidForge is alternative to Retool [Retool](https://retool.com/) and RapidForge are both platforms designed to streamline the development of internal tools, yet they cater to different user needs and technical preferences. ## Retool Overview Retool is a popular low-code platform for building internal tools, dashboards and admin panels. It offers a drag-and-drop interface with pre-built components that connect to databases (PostgreSQL, MySQL, MongoDB) and APIs. Retool uses JavaScript for customization and provides features like role-based access control, audit logs and SSO for enterprise users. It's cloud-hosted by default with self-hosted options available for enterprise plans. ## RapidForge Overview RapidForge is an open source, self-hosted platform (Apache 2.0 license) that supports scripting in Bash and Lua, making it accessible to users familiar with these languages. It deploys as a single binary with zero dependencies, allowing for quick deployment in minutes. RapidForge focuses on turning scripts into webhooks, cron jobs, and web pages with a straightforward approach. ## Key Differences | Feature | RapidForge | Retool | |---------|-----------|--------| | **Pricing** | Open source & free (Apache 2.0) | Free tier limited; paid plans start at $10/user/month | | **Deployment** | Single binary, self-hosted | Cloud-hosted; self-hosted for enterprise | | **Languages** | Bash, Lua | JavaScript, SQL | | **Setup Time** | Minutes (one command) | Longer setup with configuration | | **Dependencies** | Zero dependencies | Requires database connections | | **UI Builder** | Drag-and-drop page editor | Extensive component library | | **Target Users** | DevOps, sysadmins, small teams | Business apps, data teams | | **Learning Curve** | Low (familiar scripting) | Moderate (JavaScript required) | | **Air-gap Support** | Native support | Enterprise feature only | ## When to Choose RapidForge - You need a completely free solution with no per-user pricing - You prefer working with Bash or Lua scripts - You need to deploy quickly without complex setup - You're working in air-gapped or restricted environments - You want a lightweight, dependency-free solution - Your use case involves exposing CLI tools as web endpoints ## When to Choose Retool - You need a rich library of pre-built UI components - Your team is comfortable with JavaScript - You're building complex data-heavy dashboards - You need extensive database connectors out of the box - You prefer a managed cloud solution - You require enterprise features like SAML SSO and audit logs ## Conclusion Retool excels at building polished internal applications with its extensive component library and database integrations. RapidForge offers a simpler, cost-free alternative for teams that want to turn scripts into production tools without the overhead of a complex platform. Choose RapidForge for simplicity and zero cost; choose Retool for feature-rich internal app development.
Alternatives

Where RapidForge fits among other tools.

These pages help search visitors quickly understand the differences between RapidForge and the tools they may already know.